
How to Tie a Tie
How to Tie a Tie: Step-by-Step Guide for Classic Knots
Four in Hand Knot: Simple & Common
Learning how to tie a tie starts with the Four in Hand, one of the easiest knots to master.
It is simple, slightly asymmetrical, and often chosen for its relaxed look and easy feel.
If you are asking how do i tie a tie for daily wear, this is a practical place to begin.
It works for many occasions and pairs well with most collar types.
-
1. Stand in front of a mirror and place the tie around your neck, with the wide end in your right hand.

-
2. Wrap the right end around the skinny end counter-clockwise. The pointed end turns toward your left side 180 degrees.

-
3. After wrapping, it should look like this. You are building the knot shape here.

-
4. Pull that end up and underneath the rest of the tie carefully.

-
5. Slide the wide end down through the top layer of the knot and adjust it so it sits well around your collar.

Half Windsor Knot: A Symmetrical Classic
The Half Windsor is nearly as common as the Four in Hand, but it creates a more symmetrical and polished finish.
If you are wondering how can i tie a tie with a slightly dressier look, this knot is a strong choice.
It suits both formal and casual attire and offers a balanced shape without too much bulk.
-
1. Stand before a mirror with the wide end of the tie on your right side.

-
2. Wrap the right end around the skinny end counter-clockwise. The pointed end faces your left side 180 degrees.

-
3. Pull the wide end up and over the knot so the front side shows.

-
4. Pull the wide end under the full knot. It should point right with the back side visible.

-
5. Wrap the wide end around the front of the knot clockwise. It should point left with the front side showing.

-
6. Pull the wide end up and around the back of the knot carefully.

-
7. Pull the wide end down and through the knot under one fabric layer, then adjust it to your preference.

Full Windsor Knot: How to Tie a Tie for Formal & Larger Looks
The Full Windsor creates a larger, more formal knot than the Half Windsor.
It works well with thin, summery ties and with wide lapels and collars.
For anyone asking how can you tie a tie for formal events, this knot offers a polished result.
It is also useful when how the knot sits matters as much as the outfit itself.
-
1. With the wide end on your right, place the skinny end around your neck to the left. Wrap the wide end across the skinny end front.

-
2. Pull the wide end up and behind the skinny end so the backside of the wide end shows.

-
3. Pull the wide end across the front of the knot so it points slightly left with the front side showing.

-
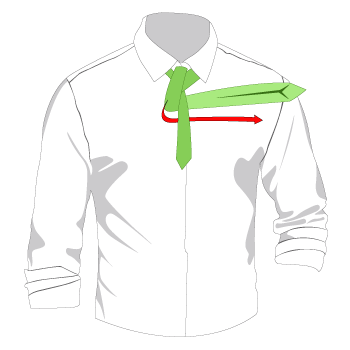
4. Wrap the wide end behind the skinny end counter-clockwise until the back end shows and points right.
-
5. Pull the wide end up and over the knot so it points upward.

-
6. Pull the wide end around and under the right side of the knot, with the backside showing and the end pointed right.

-
7. Wrap the wide end around the front clockwise.

-
8. Pull the side end up behind the knot.

-
9. Pull the front of the tie through the top layer of the knot and adjust it for a neat appearance.

Shell, Pratt or Shelby Knot: Easy & Symmetrical
This midsized knot is relatively easy to tie and lays symmetrically.
It offers many uses and has less bulk than the Half Windsor.
If you are thinking about how can we tie a tie in a balanced way, this knot is a comfortable alternative.
It is stylish, practical, and easy to wear. It can be a smart choice for a simple finish with a clean shape.
For readers comparing styles, a smaller shift in knot size can change the overall look. This section also helps explain a balanced result.
When learning different knots, trying several styles helps you find the right match for your collar and occasion.
With practice, the process becomes easier, more consistent, and more comfortable for everyday wear. As you practice how to tie a tie, each knot becomes easier to repeat with confidence. Over time, how to tie a tie feels more natural for daily wear, dress occasions, and personal style.
-
1. Begin with the tie inside out around your neck, with the wide end on your right.

-
2. Wrap the wide end behind the skinny end and bring it up.

-
3. Pull the wide end through the knot and tighten it so both backsides show.

-
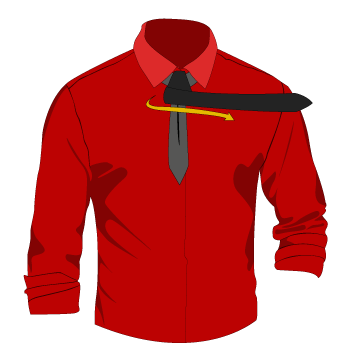
4. Wrap the wide end counter-clockwise in front of the knot until the front side shows. The knot points to your right.
-
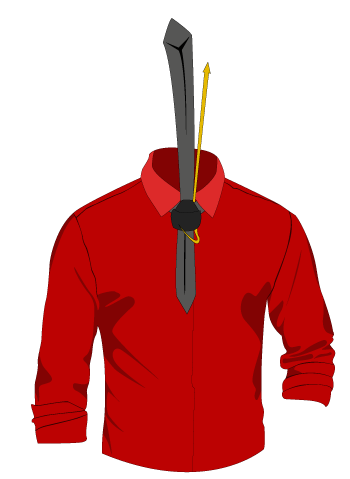
5. Pull the wide end up behind the knot for support.
-
6. Pull that end through the front layer of the knot and tighten it for a clean finish.
